Living off-grid has become more than just a trend; it’s a deliberate choice for those seeking independence, sustainability, and a deeper connection with nature. And when it comes to truly living off the grid, storing rainwater becomes one of the most essential and practical survival skills. Whether you’re doing this on a remote piece of land, preparing your eco-cabin, or supplementing your solar-powered lifestyle, a good rainwater harvesting system can be a game-changer.
Collecting and storing rainwater isn’t just about convenience; it’s about long-term resource management. In this guide, I’ll break down everything you need to know to set up a reliable system, from roof catchment to purification. No unnecessary tech jargon, just what works and why.
Key Highlights
- Rainwater harvesting supports water independence in remote and off-grid settings
- Choosing the right collection surface affects water quality significantly
- Safe storage tanks must protect from UV, pests, and contamination
- Filtration and treatment systems are critical for potable water use
- Local regulations may affect how you can legally collect and store rainwater
- DIY solutions can work, but require proper setup and ongoing maintenance
Why Storing Rainwater Matters Off-Grid
If you’re living off-grid, you already know the value of self-reliance. You might be using solar panels, composting toilets, and maybe even growing your own food. But water? That’s a non-negotiable. And depending on where you are, wells may not be viable, or they might require expensive drilling or permits.
Rainwater, on the other hand, is free. It falls from the sky, and with the right system, it can provide for your household, garden, and livestock needs. Plus, when done right, it’s surprisingly clean.
Not Just About Survival
Beyond necessity, rainwater harvesting aligns perfectly with sustainable living. It reduces runoff, eases the load on groundwater, and puts you in control of your most vital resource. It’s a natural partner to solar living and eco-travel setups, especially for those exploring tiny homes, RV conversions, or wilderness cabins.
Basic Components of a Rainwater Harvesting System
At its core, a rainwater harvesting system consists of a few simple parts. Let’s walk through what you’ll actually need, and what each part does.
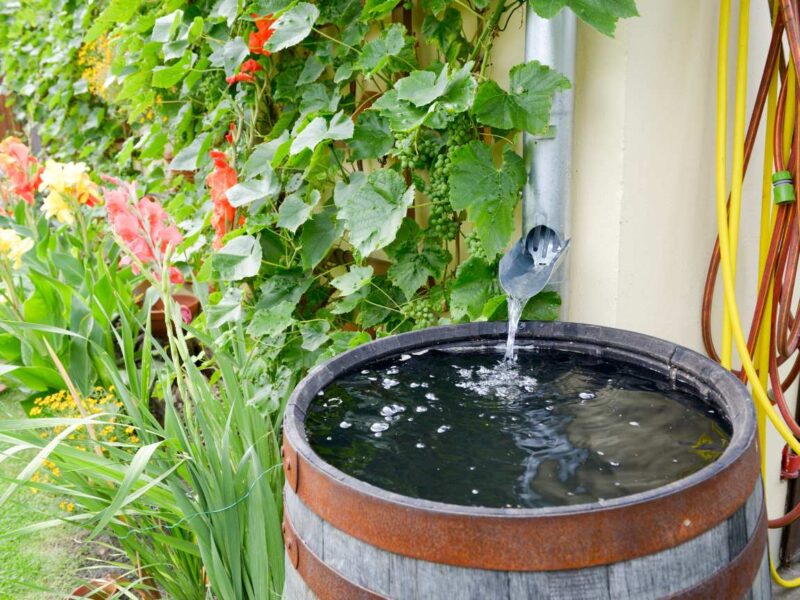
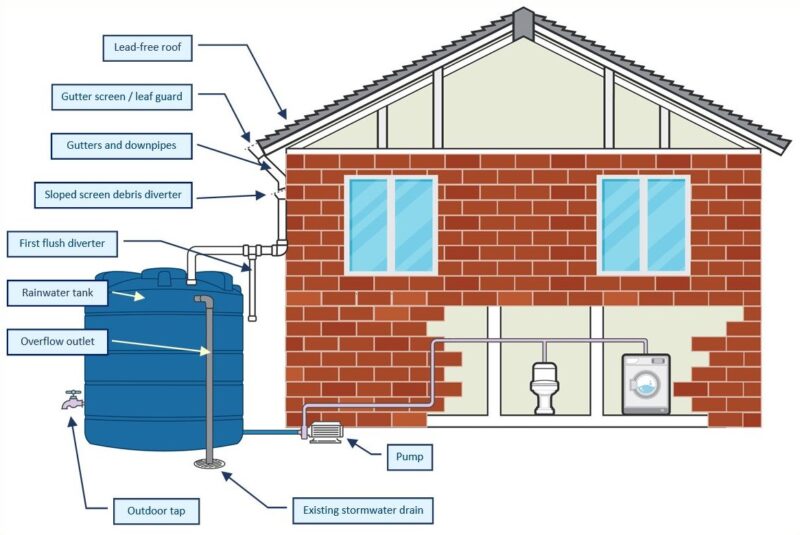
- Catchment surface ─ Your roof is usually the best option. Metal and tile roofs are ideal because they don’t leach chemicals. Avoid asphalt shingles if you’re planning to drink the water.
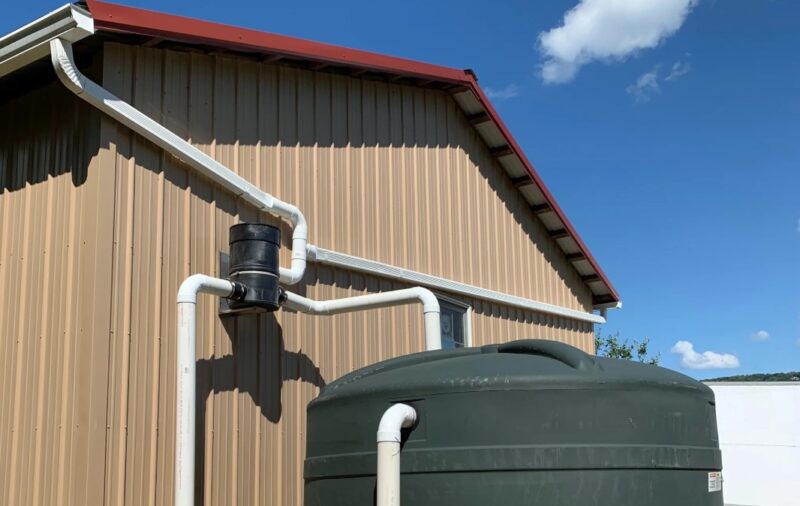
- Gutters and downspouts ─ These channel water from the roof to your storage tank. Add leaf guards to avoid clogging the pipes.
- First-flush diverters ─ The first few gallons of rain often carry debris and contaminants from the roof. Diverters flush this out so it doesn’t enter your tank.
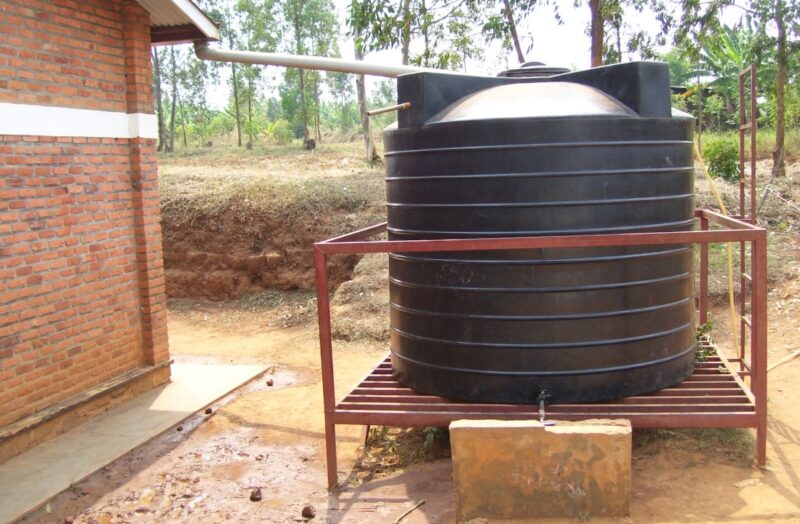
- Storage tanks or cisterns ─ Tanks can be above or below ground. Plastic (HDPE), fiberglass, or even concrete are all viable options depending on your budget and space.
- Filtration and Treatment
Especially important for potable use. A multi-stage system with sediment filters, activated carbon, and UV or ozone sterilizers is best if you’re drinking the water.
How to Choose the Right Storage Tank
Tanks come in all sizes, from 55-gallon drums to 10,000-gallon cisterns. When choosing yours, consider these:
- Material: HDPE plastic tanks are food-safe and UV-resistant. Metal tanks are durable but can corrode.
- Size: Estimate your monthly usage and local rainfall. In general, 1,000 gallons is the minimum for a small off-grid household.
- Location: Elevating your tank can help with gravity-fed water pressure. Shaded areas also help reduce algae growth.
It’s also critical to ensure your tanks are sealed tight to keep out mosquitoes, rodents, and debris.
How to Keep Your Water Safe for Use
Even if you’re not drinking your rainwater, you’ll still want to keep it safe, especially if you’re using it to wash dishes or bathe. Here’s a simple way to think about it:
- Pre-filtration: Leaf screens, mesh filters, and first-flush systems
- Storage protection: Opaque, sealed tanks with UV shielding
- Post-filtration: Use fine filters (1–5 microns), activated carbon, and UV light before tap use
If you’re drinking the water, don’t skip the sterilization step. Iodine tablets and boiling are backups, but a small UV filter system gives consistent results.
Watch Out for These Common Mistakes
Here’s where I see a lot of people go wrong when starting out:
- Ignoring the roof type ─ If you’re collecting drinking water, your roof material really matters.
- Not calculating storage properly ─ One rainfall event can overflow small tanks, wasting water and damaging gutters.
- No first-flush system ─ This is a cheap addition but makes a huge difference in water quality.
- Lack of maintenance ─ Filters clog. Tanks need cleaning. Set a schedule.
A solid setup doesn’t mean much if you don’t keep it running properly.
Testing and Regulations ─ What to Know Before You Start

Depending on where you live, there may be laws governing how you can collect and store rainwater. In some U.S. states, collection is encouraged. In others, it’s restricted unless you follow specific guidelines.
Before investing in gear, check local codes. You don’t want to be forced to dismantle your system or face fines.
On the topic of testing: It’s a smart idea to test your water quarterly if you’re drinking it. Local extension services or labs can check for bacteria, heavy metals, and chemicals.
Tech Tools and Planning Support
Rainwater collection might feel like an old-school, low-tech solution, but today’s tools can help you build and manage a smarter system. For example, mobile apps now estimate how much rainfall you can harvest based on your roof size and local climate. These tools are especially handy when you’re sizing your storage tanks or planning for seasonal changes.
And here’s another tip, not everything you read online about DIY water storage or treatment is accurate. Forums and YouTube tutorials vary wildly in quality. If you’re pulling together guides, research, or notes from different online sources, it helps to double-check how trustworthy and human-authored the material is. One useful way to verify that is with tools like chatgpt detector, which can help assess if the content you’re referencing feels genuinely written and not just auto-generated filler. When your safety depends on the accuracy of information, like building safe water systems, authenticity matters more than ever.
Off-Grid Rainwater Setup ─ A Sample Scenario
Let’s say you’re building a small cabin in the Southwest U.S., an area with seasonal rainfall. Here’s how your setup might look:
- Roof: 400 sq. ft. metal roof
- Rainfall: 10 inches annually
- Catchment: 2,500 gallons/year (approx.)
- Tank: 1,500-gallon HDPE tank, elevated
- Filtration: Leaf guard + sediment filter + UV sterilizer
- Cost: Around $1,200 to $1,800, depending on tank and filtration choice
That’s a very doable project for most off-grid enthusiasts. And the payoff is huge, not just in money saved, but in the freedom it brings.
Final Thoughts
Rainwater harvesting isn’t just a backup; it can become your primary source of water when done right. Whether you’re camping long-term, building an off-grid lifestyle, or simply reducing your environmental footprint, a rainwater system is one of the smartest and most sustainable steps you can take.
Start small, learn as you go, and don’t get overwhelmed. Like everything else in off-grid living, it’s about building systems that work with nature, not against it.
If you’re already living solar-powered or planning eco-travel adventures, this is the perfect way to round out your independence toolkit.